How to create a file using terraform
👋 Hello, and welcome to my DevOps journey! 🚀 I am Priyanka Varshney,🛠️ As an aspiring DevOps engineer, I'm all about bridging the gap between development and operations, making software delivery seamless and efficient. 💻🔧 On this Hashnode blog, I'll be sharing my learnings, experiences and adventures as I dive deep into the world of continuous integration, automation, and cloud technologies. ☁️⚙️ Let's connect, learn, and grow as a vibrant DevOps community. Follow my Hashnode blog, and let's embrace the DevOps adventure together! 🤝🔗
Introduction
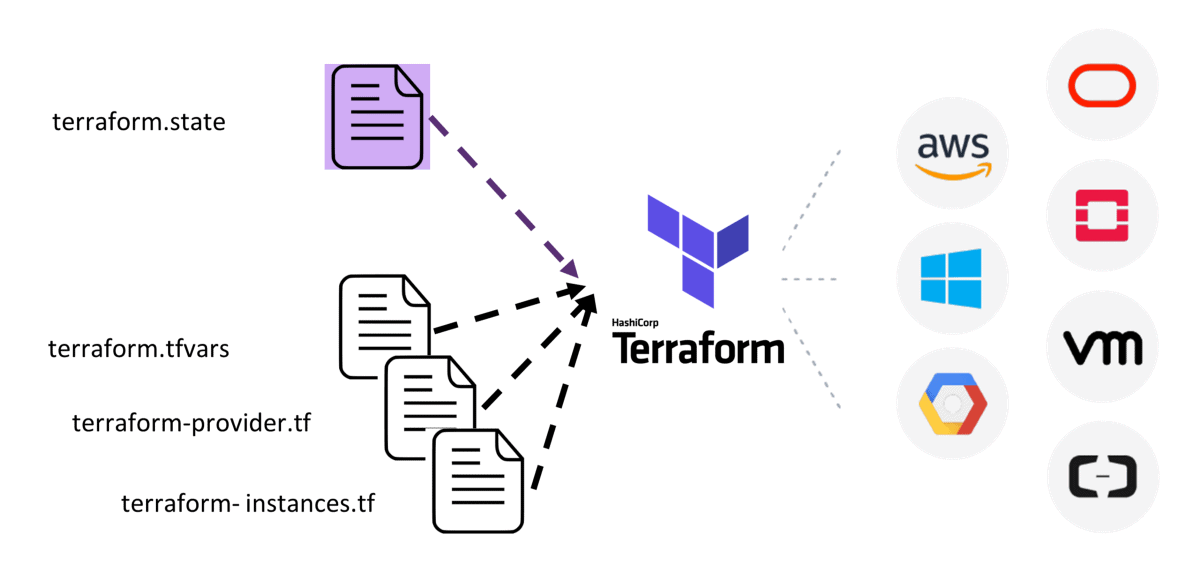
Terraform is an Infrastructure as Code (IaC) tool that allows you to define and provision infrastructure using a declarative configuration language (HCL - HashiCorp Configuration Language).
With Terraform, infrastructure can be versioned, reused, and shared just like application code. It supports major cloud providers like AWS, Azure, and GCP, and can manage anything from VMs and storage to DNS and networking.
One of its key features is the execution plan (terraform plan) that shows what will change before applying, and state management to track real-world resources.
Basic Commands :
terraform init # Initialize Terraform in a directory
terraform plan # Preview changes before applying
terraform apply # Deploy infrastructure
terraform destroy # Delete all resources
Install Terraform:(Linux )
Launch an EC2 Instance:
Create an EC2 instance with 15GB of storage.
Install Terraform:
Start by updating your package index and installing prerequisites:
sudo apt-get update && sudo apt-get install -y gnupg software-properties-commonAdd the HashiCorp GPG key:
  wget -O- https://apt.releases.hashicorp.com/gpg | \
  gpg --dearmor | \
  sudo tee /usr/share/keyrings/hashicorp-archive-keyring.gpg > /dev/null
Verify the GPG key’s fingerprint:
  gpg --no-default-keyring \
  --keyring /usr/share/keyrings/hashicorp-archive-keyring.gpg \
  --fingerprint
Add the official HashiCorp repository to your sources list. Use the
lsb_release -cscommand to retrieve your system's codename (e.g., buster, groovy, sid):echo "deb [signed-by=/usr/share/keyrings/hashicorp-archive-keyring.gpg] \ https://apt.releases.hashicorp.com $(lsb_release -cs) main" | \ sudo tee /etc/apt/sources.list.d/hashicorp.listUpdate your package list:
sudo apt updateFinally, install Terraform:
  sudo apt-get install terraform
  terraform --version

Now you can create terraform file using the following commands :
- Open the command prompt and create a
main.tf
vim main.tf
- You can include the block, parameter, and argument as follows:
Block: A structural element in Terraform (e.g.,
resource,variable,output).Parameter: Input settings or attributes used inside a block (e.g.,
defaultin avariableblock).Argument: Key-value pairs within a block that define configurations (e.g.,
ami = "ami-12345678").

You can use
terraform initto initialize the Terraform file and then validate it withterraform validate-terraform init terraform validate
You can run
terraform plan.This command allows you to preview the modifications Terraform will make to your infrastructure before applying them. It provides insights into the planned actions without executing them.
terraform plan

- You can run
terraform apply
terraform apply

You can do ls to check the list of files , then check the automate.txt file by using the cat command.
- You can delete as well by using the
terraform destroy
terraform destroy

To skip the manual confirmation process, you can use terraform apply -auto-approve
In Terraform, the -auto-approve flag is used with the terraform apply or terraform destroy commands. It automatically approves the execution plan without prompting for user confirmation. This is particularly helpful in automated workflows or scripts.
terraform apply --auto-approve
terraform destroy --auto-approve


Thank you for reading :-)