Docker Basics & Advanced Challenge
👋 Hello, and welcome to my DevOps journey! 🚀 I am Priyanka Varshney,🛠️ As an aspiring DevOps engineer, I'm all about bridging the gap between development and operations, making software delivery seamless and efficient. 💻🔧 On this Hashnode blog, I'll be sharing my learnings, experiences and adventures as I dive deep into the world of continuous integration, automation, and cloud technologies. ☁️⚙️ Let's connect, learn, and grow as a vibrant DevOps community. Follow my Hashnode blog, and let's embrace the DevOps adventure together! 🤝🔗

Welcome to the Week 5 Docker Challenge! In this task, you will work with Docker concepts and tools. This challenge covers the following topics:
Introduction and Purpose: Understand Docker’s role in modern development.
Virtualization vs. Containerization: Learn the differences and benefits.
What is build : Understand the Docker build process.
Docker Terminologies: Get familiar with key Docker terms.
Docker Components: Explore Docker Engine, images, containers, and more.
Project Building Using Docker: Containerize a sample project.
Multi-stage Docker Builds / Distroless Images: Optimize your images.
Docker Hub (Push/Tag/Pull): Manage and distribute your Docker images.
Docker Volumes: Persist data across container runs.
Docker Networking: Connect containers using networks.
Docker Compose: Orchestrate multi-container applications.
Task 1: Introduction and Conceptual Understanding
Docker plays a crucial role in modern DevOps by enabling containerization. Here’s a brief overview of its purpose:
Consistent Environments: Docker ensures that applications run the same way in different environments by packaging them along with their dependencies into containers.
Scalability: Containers can be easily scaled up or down based on demand, making it ideal for handling fluctuating workloads.
CI/CD Integration: Docker integrates seamlessly with Continuous Integration/Continuous Deployment (CI/CD) pipelines, automating the testing and deployment processes.
Microservices Architecture: Docker supports the microservices architecture, allowing applications to be broken down into smaller, manageable services that can be developed, deployed, and scaled independently.
By simplifying deployment, enhancing scalability, and ensuring consistency across environments, Docker has become a key player in the DevOps landscape.
Compare Virtualization vs. Containerization and explain why containerization is the preferred approach for microservices and CI/CD pipelines
Virtualization
What it is: Runs multiple virtual machines (VMs) on one physical server.
How it works: Each VM has its own operating system (OS).
Resource Use: Heavy because each VM needs its own OS.
Boot Time: Slow because it takes time to start each OS.
Containerization
What it is: Runs multiple containers on one server or VM.
How it works: Containers share the host OS.
Resource Use: Light because containers share the same OS.
Boot Time: Fast because they don't need to start a new OS.
Why Containers are Better for Microservices and CI/CD
Lightweight: Uses less resources, perfect for small services.
Fast Deployment: Starts quickly, speeds up development.
Consistency: Works the same in all environments (dev, test, prod).
Portability: Can run anywhere (laptop, cloud, etc.).
In short, containerization is preferred because it's light, fast, consistent, and portable, making it ideal for modern applications and development practices.
Task 2: Create a Dockerfile for a Sample Project
Select or Create a Sample Application:
- Choose a simple application (for example, a basic Node.js, Python, or Java app that prints “Hello, Docker!” or using a flask ).
Create a
Dockerfilethat defines how to build an image for your application.Include comments in your Dockerfile explaining each instruction.
Step 1: Create the Flask App
- Inside the
hello-dockerdirectory, createapp.py:
- Inside the
    from flask import Flask

    app = Flask(__name__)

    @app.route("/")
    def home():
        return "Hello, Docker!"

    if __name__ == "__main__":
        app.run(host="0.0.0.0", port=5000)
Step 2: Create a
requirements.txtfileflaskStep 3: Create a
DockerfilebashCopyEdit# Use official Python image FROM python:3.9 # Set working directory WORKDIR /app # Copy project files COPY . . # Install dependencies RUN pip install -r requirements.txt # Expose port 5000 EXPOSE 5000 # Run the Flask app CMD ["python", "app.py"]Update and install docker using the following the command:
Sudo apt-get update && sudo apt-get install docker.ioAdd the user in docker group
By default, Docker requires root (sudo) permissions to run commands because it interacts with the system’s kernel and manages containers. Adding your user to the
dockergroup allows you to run Docker commands without usingsudo.sudo usermod -aG docker $USER newgrp dockerVerify that you can run Docker without sudo:
docker psBuild the Docker image:
docker build -t hello-docker:latest .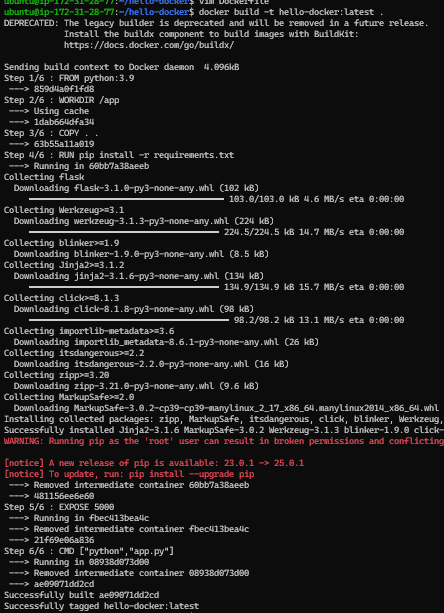
Check the image using the following command:
docker images
Run a Container in Detached Mode (Background)
 docker run -dp 5000:5000 hello-docker:latest

 #check the container
 docker ps
To allow incoming traffic to a specific port in an AWS EC2 Security Group, follow these steps:
Open the AWS EC2 Security Groups Page
Find and Edit Your Security Group
Add a New Inbound Rule : 5000
Find your EC2 Public IP in the AWS Console
Open
http://<EC2-PUBLIC-IP>:5000in your browser
Check logs using
docker logs <container-id>
Task 3: Explore Docker Terminologies and Components
Document Key Terminologies:
Image:
A Docker Image is like a blueprint for your application. It contains everything needed to run a program, including the code, dependencies, and configurations.
Container:
A Docker Container is a running instance of an image. It’s where your application actually runs.
Dockerfile:
A Dockerfile is a set of instructions used to create a Docker Image. It defines what goes inside the image (like which OS, dependencies, and commands to run).
Explain the main Docker components (Docker Engine, Docker CLI, Docker Hub, etc.) and how they interact.
Docker Engine (Core of Docker)
🔹 What it is: The software that runs and manages containers.
🔹 How it works: It takes your Docker images and runs them as containers.Docker CLI (Command Line Interface)
🔹 What it is: A tool that lets you interact with Docker using commands.
🔹 How it works: You use commands likedocker runto start containers,docker buildto createDocker Hub (Public Image Registry)
🔹 What it is: A cloud-based repository where Docker images are stored and shared.
🔹 How it works: You can pull images (docker pull nginx) or push your own images (docker push my-app).
Task 4: Optimize Your Docker Image with Multi-Stage Builds
Implement a Multi-Stage Docker Build:
Modify your existing
Dockerfileto include multi-stage builds.Aim to produce a lightweight, distroless (or minimal) final image.
  # Start with the official Python base image
  FROM python:3.11-slim as builder

  # Set the working directory
  WORKDIR /app

  # Copy and install dependencies
  COPY requirements.txt .
  RUN pip install --no-cache-dir --upgrade -r requirements.txt

  # Copy the app files
  COPY . .

  # Use Google's Distroless base image (only contains runtime essentials)
  FROM gcr.io/distroless/python3

  # Set the working directory again
  WORKDIR /app

  # Copy the installed dependencies and app from the builder stage
  COPY --from=builder /usr/local /usr/local
  COPY --from=builder /app /app

  # Expose port (if needed)
  EXPOSE 5000

  # Run the Flask app
  CMD ["app.py"]
Then build the image by using the following command:
    docker build -t hello-docker:latest .
    #check the image size after multistage
    docker images

Before Multistage :

Distroless Dockerfile (Minimal, Secure Image)
A Distroless Docker Image is a lightweight, secure, and minimal image that contains only the necessary dependencies to run an application—without unnecessary OS tools, shells, or package managers.
Why Use Distroless?
Smaller Size → Reduces attack surface and speeds up deployments
More Secure → No package manager (apt, yum), no shell (bash), fewer vulnerabilities
Faster Startup → Less overhead, optimized for containerized applications.
Task 5: Manage Your Image with Docker Hub
Create a docker hub account : https://hub.docker.com/ and create a repository called hello-docker
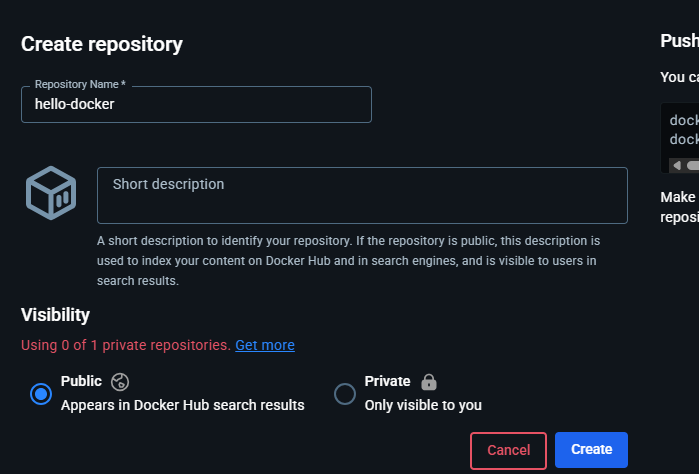
Tag Your Image:
Tag your image appropriately:
docker tag hello-docker:latest varpriya/hello-docker:latest
Push Your Image to Docker Hub:
Log in to Docker Hub if necessary:
docker login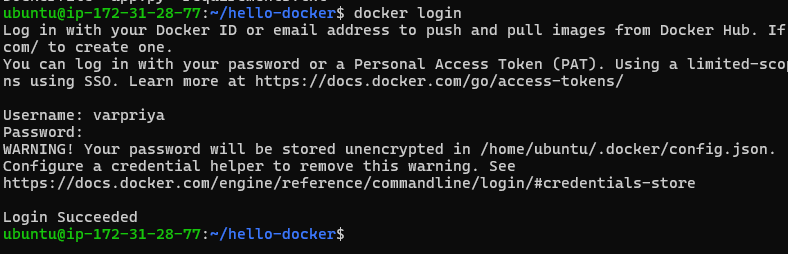
When authenticating to a private Docker registry (like GitHub Container Registry, AWS ECR, or Docker Hub) using docker login, you might need to use a Personal Access Token (PAT) instead of a password.
How to Create a Personal Access Token on Docker Hub 🔑
If you have Two-Factor Authentication (2FA) enabled on Docker Hub, you must use a Personal Access Token (PAT) instead of your password for authentication.
Steps to Create a Docker Hub Access Token
1. Log in to Docker Hub
Go to Docker Hub
Sign in with your Docker credent****ials
2. Go to Security Settings
Click on your profile icon (top right corner)
Select Accoun****t Settings
Navigate to the Security tab
3. Generate a New Access Token
Scroll down to "Access Tokens"
Click "New Access Token"
Give it a name (e.g., "Docker CLI Token")
Click **"**Generate"
4. Copy & Save the Token
Copy the generated toke****n (You won**’t see it again** after leaving the page)
Save it securely .
- Push the image:
docker push varpriya/hello-docker:latest
(Optional) Pull the Image:
Verify by pulling your image:
docker pull varpriya/hello-docker:latest
Task 6: Persist Data with Docker Volumes
What is a Docker Volume?
A volume is a persistent storage area managed by Docker. Even if the container is deleted, the volume keeps the data.
Volumes are persistent storage mechanisms managed by the Docker daemon. They retain data even after the containers using them are removed.
Create a Docker Volume:
Create a Docker volume:
  docker volume create my_volume
  #check the volume
  docker volume ls
Run a Container with the Volume:
Run a container using the volume to persist data:
docker run -d -p 5000:5000 -v my_volume:/app/data hello-docker:latest
Then you can test the volume :
  docker exec -it <your-container-id> sh
  #create a test file inside the container
  # echo "hello from container" > /app/data/test.txt
  # ls
  test.txt
Now you can check the test file in my_volume
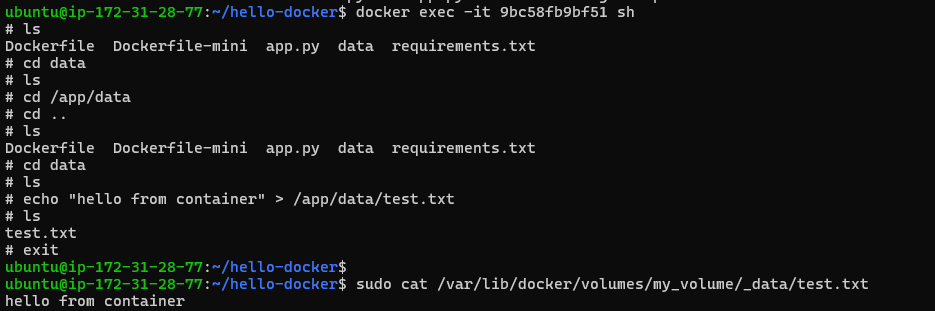
Task 7: Configure Docker Networking
Docker creates virtual networks so that containers can communicate with each other — either:
On the same host, or
Across multiple hosts .
Each container is like a mini computer with its own IP address, and Docker helps them talk over isolated or shared networks.
| Type | Use Case |
bridge | Default network for standalone containers on the same Docker host |
host | Shares the host’s network namespace (no isolation) |
none | No networking at all |
overlay | For multi-host communication (used in Docker Swarm) |
macvlan | Assigns MAC addresses (advanced use cases) |
How Communication Works
Each container gets its own IP address.
If they're on the same custom bridge, they can resolve each other by container name.
Docker handles the internal DNS resolution for you.
Create a Custom Docker Network:
 docker network create my_network
 #check the network
 docker network ls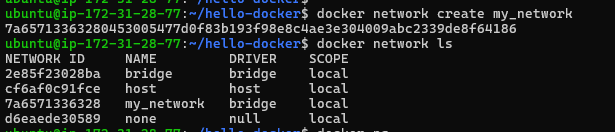
2. Now you can modify app.py and requirements.txt for mysql database and rebuild the image :
# add for mysql i app.py
from flask import Flask
import mysql.connector

app = Flask(__name__)

@app.route("/")
def home():
    try:
        conn = mysql.connector.connect(
            host="db",  # service name from docker-compose
            user="user",
            password="password",
            database="testdb"
        )
        return "Connected to MySQL!"
    except Exception as e:
        return f"MySQL connection failed: {str(e)}"

if __name__ == "__main__":
    app.run(host="0.0.0.0", port=5000)
# add mysql-connector-python in requirements.txt
flask
mysql-connector-python
# rebuild the image
 docker build . -t hello-docker:latest
Run Containers on the Same Network:
Run two containers (e.g., your sample app and a simple database like MySQL) on the same network to demonstrate inter-container communication:
 docker run -d -p 5000:5000 --name flask-app --network my_network hello-docker:latest
 docker run -d --name db -v my_sql_data:/var/lib/mysql --network my_network -e MYSQL_ROOT_PASSWORD=rootpass -e MYSQL_DATABASE=te
 stdb -e MYSQL_USER=user -e MYSQL_PASSWORD=password mysql:5.7

 #check the containers
 docker ps

Now you can inspect the network :
docker network inspect my_network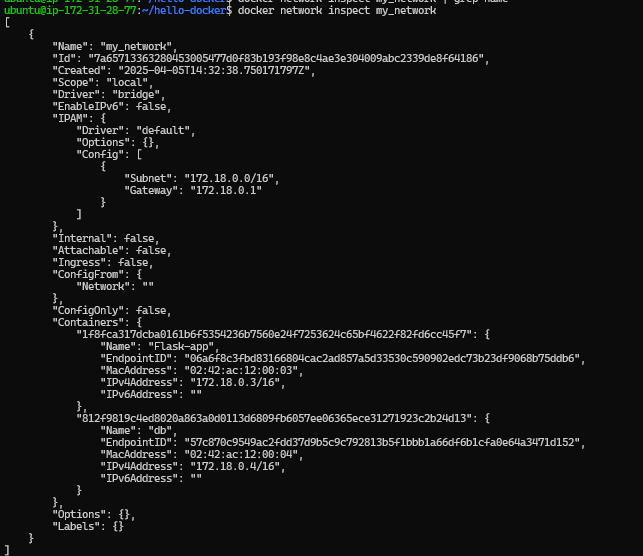
Now you can see the both the containers(flask-app and db) are on same network named my_network
Once your container is up and running, you should see logs indicating that the Flask app is running on all interfaces:
  * Running on http://127.0.0.1:5000
  * Running on http://172.18.0.3:5000
This means the app is now accessible on your local machine at:
http://localhost:5000
You can delete docker container using the following command:
docker kill <Container-ID>
You can delete docker network using the following command:
docker network ls
docker network rm <Network-ID>
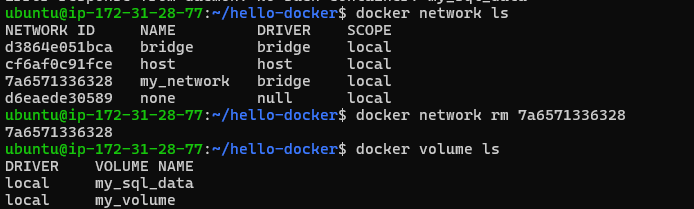
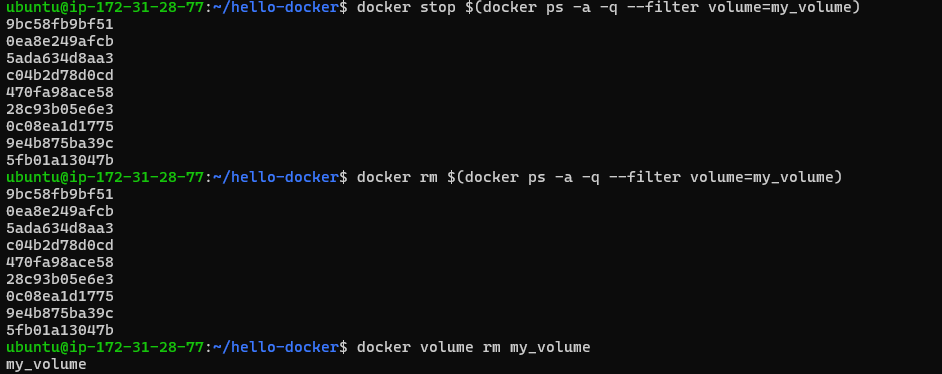
You can delete docker volume using the following command:
docker volume ls
docker stop $(docker ps -a -q --filter volume=volume-name)
docker rm $(docker ps -a -q --filter volume=volume-name)
docker volume rm <volume name>
If you're cleaning house:
docker volume prune
Note: This removes all unused volumes.
Task 8: Orchestrate with Docker Compose
Create a docker-compose.yml File:
Write a
docker-compose.ymlfile that defines at least two services (e.g., your sample app and a database).services: web: build: . ports: - "5000:5000" depends_on: - db networks: - my_network db: image: mysql:5.7 environment: MYSQL_ROOT_PASSWORD: rootpass MYSQL_DATABASE: testdb MYSQL_USER: user MYSQL_PASSWORD: password volumes: - my_sql_data:/var/lib/mysql networks: - my_network volumes: my_sql_data: networks: my_network:
Services:
1. web
Builds from the local Dockerfile.
Maps container port
5000to host port5000.Depends on the
dbservice to start first.Connected to the custom network
my_network.
2. db (MySQL)
Uses the official
mysql:5.7image.Configured with:
rootpassword:rootpassDatabase name:
testdbUser:
userUser password:
password
Persists data using a named volume
my_sql_data.Also connected to
my_network.
Volumes:
my_sql_data: Stores MySQL data persistently across container restarts.
Networks:
my_network: A user-defined bridge network allowing services to communicate by name (e.g.,webcan connect todbusing the hostnamedb).Deploy Your Application:
Bring up your application using:
docker-compose up -d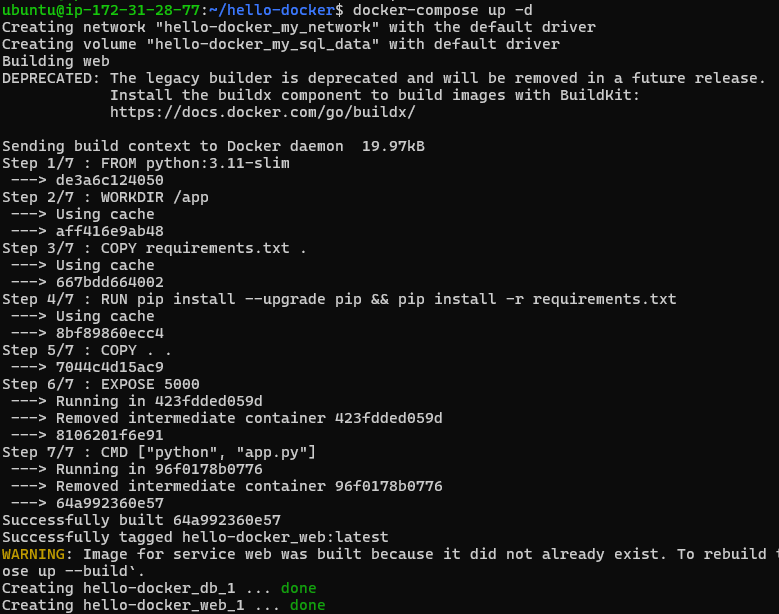
Test the setup, then shut it down using:
  #check containers
  docker ps

Test the setup, then shut it down using:
docker-compose down

Task 9: Analyze Your Image with Docker Scout
Docker Scout is a tool provided by Docker to help you analyze your Docker images for vulnerabilities, outdated dependencies, and best practices.
Here’s how you can use Docker Scout to analyze your image:
What Docker Scout Does
Scans your Docker image for:
Known vulnerabilities (CVEs).
Outdated packages or base images.
Misconfigurations (e.g. running as root).
Gives insights on how to remediate issues (e.g., upgrading a package or using a newer base image).
Helps ensure images follow security and compliance standards.
1. Enable Docker Scout CLI (Docker Desktop ≥ v4.17)
Make sure you're using the latest Docker version and logged into Docker Hub.
To check:
 curl -fsSL https://raw.githubusercontent.com/docker/scout-cli/main/install.sh -o install-scout.sh
 sh install-scout.sh

-
Execute Docker Scout on your image to generate a detailed report of vulnerabilities and insights:
docker scout cves hello-docker:latestAlternatively, if available, run:
docker scout quickview hello-docker:latestto get a summarized view of the image’s security posture.

Optional: Save the output to a file for further analysis:
docker scout cves hello-docker:latest > scout_report.txt
Summary:
In Week 5 of the challenge, we explore both basic and advanced Docker concepts. You'll start by understanding Docker's importance in modern software development, compare virtualization with containerization, and dive into the Docker build process. As the challenge progresses, you'll work with essential Docker components like images, containers, and volumes, and learn to containerize a sample project. Advanced topics include multi-stage builds, using distroless images for optimization, managing images with Docker Hub, and orchestrating services using Docker Compose. You'll also get a glimpse of Docker Scout to analyze image vulnerabilities and improve your container security.
Thank you for reading :-)