Modern E-commerce Platform Deployment using Kubernetes.
👋 Hello, and welcome to my DevOps journey! 🚀 I am Priyanka Varshney,🛠️ As an aspiring DevOps engineer, I'm all about bridging the gap between development and operations, making software delivery seamless and efficient. 💻🔧 On this Hashnode blog, I'll be sharing my learnings, experiences and adventures as I dive deep into the world of continuous integration, automation, and cloud technologies. ☁️⚙️ Let's connect, learn, and grow as a vibrant DevOps community. Follow my Hashnode blog, and let's embrace the DevOps adventure together! 🤝🔗

Tech Stack Breakdown:
Next.js 14: A powerful React framework used to build fast and SEO-friendly websites and web apps. Version 14 includes the latest features like server components and routing improvements.
TypeScript: A programming language that adds types to JavaScript, helping catch errors early and make code easier to understand and maintain.
MongoDB: A NoSQL database used to store information like products, users, orders, etc., in a flexible, scalable way.
UI & UX Features:
Tailwind CSS: A utility-first CSS framework that makes it quick to design beautiful, responsive interfaces without writing much custom CSS.
Secure authentication: Users can log in or sign up safely. Think of features like password encryption, login sessions, and maybe social login.
Real-time cart updates: When users add or remove products, the cart updates instantly—no need to reload the page.
Seamless shopping experience: Everything feels smooth and easy for the user—from browsing products to checkout.
Architecture
EasyShop follows a three-tier architecture pattern:
1. Presentation Tier (Frontend)
This is the user-facing part of the app—the interface people see and interact with when they visit your site.
Tools & Features:
Next.js React Components: Reusable building blocks of the UI (like buttons, product cards, etc.) written in React and rendered using Next.js.
Redux for State Management: Manages app-wide state (like user data, cart items) so different parts of the UI can share and update data smoothly.
Tailwind CSS for Styling: A utility-first CSS framework used to design beautiful and responsive UI quickly.
Client-side Routing: Allows fast navigation between pages without refreshing the whole site—makes the app feel more like a native experience.
Responsive UI Components: Layout and design adjust to different screen sizes—looks great on mobile, tablet, and desktop.
2. Application Tier (Backend)
This is where all the logic and processing happens—it acts as the bridge between the frontend and the database.
Tools & Responsibilities:
Next.js API Routes: Built-in backend endpoints to handle things like login, fetching products, creating orders, etc.
Business Logic: Rules that define how the app should behave (e.g., "a user can't checkout with an empty cart").
Authentication & Authorization: Controls who can log in and what they can access (e.g., admin vs customer).
Request Validation: Checks if the data sent by users (like forms) is correct and safe.
Error Handling: Manages issues gracefully, like when a product isn't found or login fails.
Data Processing: Prepares or transforms data before sending it to the frontend or storing it in the database.
3. Data Tier (Database)
This is the storage layer, where all the persistent data is kept—like products, users, orders, etc.
Tools & Concepts:
MongoDB Database: A NoSQL database that stores data in flexible, JSON-like documents.
Mongoose ODM: A library that helps you interact with MongoDB using a more structured and object-oriented approach.
Data Models: Blueprints for data (e.g., what a "Product" or "User" should contain).
CRUD Operations: The core actions: Create, Read, Update, Delete—used to manage data.
Data Validation: Ensures that data saved to the database is accurate and complete (e.g., an email must be valid, a product must have a price).
Lets start:
Prerequisites:
A running Kubernetes cluster (Kind, or a cloud provider like GKE, EKS, AKS)
kubectl installed and configured
helm installed (if using Helm charts)
Docker installed and configured
Ingress controller installed (NGINX Ingress recommended)
Fork and clone a E-commerce application repository from githhub
After forking, you need to clone the repository to your local machine. Go to the repository page in your GitHub account.
Click on the “Code” button, then copy the URL provided (either HTTPS or SSH, depending on your preference).
Open your terminal (or command prompt) and type the following command, replacing the URL with the one you copied:
  git clone https://github.com/var-priya/E-commerce-application.git
  cd E-commerce-application
Install Docker
sudo apt-get update && sudo apt-get install docker.ioInstall Kind
  curl -Lo ./kind https://kind.sigs.k8s.io/dl/v0.27.0/kind-linux-amd64
  chmod +x ./kind
  sudo mv ./kind /usr/local/bin/kind
Install kubectl
  curl -LO "https://dl.k8s.io/release/$(curl -L -s https://dl.k8s.io/release/stable.txt)/bin/linux/amd64/kubectl"
  chmod +x kubectl
  sudo mv ./kubectl /usr/local/bin/kubectl
Login to dockerhub : https://hub.docker.com/ and create a account
docker loginBuild Application Image
  # Build the application image
  docker build -t your-dockerhub-username/eshop-app:latest .

  # Push to Docker Hub
  docker push your-dockerhub-username/eshop-app:latest
Build Migration Image
  # Build the migration image
  docker build -t your-dockerhub-username/eshop-migration:latest -f Dockerfile.migration .

  # Push to Docker Hub
  docker push your-dockerhub-username/eshop-migration:latest
Kind Cluster Setup
Create a directory named K8s
  mkdir k8s
  cd k8s
Create new cluster
Create 00-kind-config.yaml with the following content:
vim 00-kind-config.yamlkind: Cluster apiVersion: kind.x-k8s.io/v1alpha4 nodes: - role: control-plane kubeadmConfigPatches: - | kind: InitConfiguration nodeRegistration: kubeletExtraArgs: node-labels: "ingress-ready=true" extraPortMappings: - containerPort: 80 hostPort: 80 protocol: TCP - containerPort: 443 hostPort: 443 protocol: TCPkind create cluster --name easyshop --config 00-kind-config.yamlThis command creates a new Kind cluster using our custom configuration with one control plane.
Generating Secure Secrets for Deployment
When deploying to EC2, replace your-ec2-ip with your actual EC2 instance address.
To generate secure secret keys, use these commands in your terminal:
  # For NEXTAUTH_SECRET
  openssl rand -base64 32

  # For JWT_SECRET
  openssl rand -hex 32
Create Namespace
Create namespace.yaml with the following content:
vim namespace.yamlapiVersion: v1 kind: Namespace metadata: name: easyshopApply Namespace for the application:
kubectl apply -f namespace.yaml
Create ConfigMap
Create 04-configmap.yaml with the following content:
vim 04-configmap.yaml
     apiVersion: v1
      kind: ConfigMap
      metadata:
        name: easyshop-config
        namespace: easyshop
      data:
        MONGODB_URI: "mongodb://mongodb-service:27017/easyshop"
        NODE_ENV: "production"
        NEXT_PUBLIC_API_URL: "http://YOUR_EC2_PUBLIC_IP/api"  # Replace with your YOUR_EC2_PUBLIC_IP
        NEXTAUTH_URL: "http://YOUR_EC2_PUBLIC_IP"             # Replace with your YOUR_EC2_PUBLIC_IP
        NEXTAUTH_SECRET: "KU4WleadP0sQE+PWkTxUeWN3zBQNZ4suxJnO1davpOo="
        JWT_SECRET: "e2e358d3a115c97e6c2d7df1dc8d0fa5dc6a14f82ecceac0e947eb9f5bea6056"
Apply ConfigMap for the application:
kubectl apply -f 04-configmap.yaml
Create secrets
Create 05-secrets.yaml with the following content:
vim 05-secrets.yaml
     apiVersion: v1
      kind: Secret
      metadata:
        name: easyshop-secret
        namespace: easyshop
      type: Opaque
      stringData:
        JWT_SECRET: "change-this-in-production"
        NEXTAUTH_SECRET: "change-this-in-production"
Apply Secret for the application:
kubectl apply -f 05-secrets.yaml
Create mongodb-service.yaml
Create 06-mongodb-service.yaml with the following content:
vim 06-mongodb-service.yaml
     apiVersion: v1
      kind: Service
      metadata:
        name: mongodb-service
        namespace: easyshop
      spec:
        ports:
          - port: 27017
            targetPort: 27017
        selector:
          app: mongodb
Apply mongodb-service.yaml for the application:
kubectl apply -f 06-mongodb-service.yaml
Create mongodb-statefulset.yaml
Create 07-mongodb-statefulset.yaml with the following content:
vim 07-mongodb-statefulset.yaml
     apiVersion: apps/v1
      kind: StatefulSet
      metadata:
        name: mongodb
        namespace: easyshop
      spec:
        serviceName: mongodb-service
        replicas: 1
        selector:
          matchLabels:
            app: mongodb
        template:
          metadata:
            labels:
              app: mongodb
          spec:
            containers:
              - name: mongodb
                image: mongo:latest
                ports:
                  - containerPort: 27017
                volumeMounts:
                  - name: mongodb-storage
                    mountPath: /data/db
                resources:
                  requests:
                    memory: "256Mi"
                    cpu: "250m"
                  limits:
                    memory: "512Mi"
                    cpu: "500m"
            volumes:
              - name: mongodb-storage
                persistentVolumeClaim:
                  claimName: mongodb-pvc
Apply mongodb-statefulset.yaml for the application:
kubectl apply -f 07-mongodb-statefulset.yaml
Create easyshop-deployment.yaml
Create 08-easyshop-deployment.yaml with the following content:
vim 08-easyshop-deployment.yaml
    apiVersion: v1
    apiVersion: apps/v1
    kind: Deployment
    metadata:
      name: easyshop
      namespace: easyshop
    spec:
      replicas: 2
      selector:
        matchLabels:
          app: easyshop
      template:
        metadata:
          labels:
            app: easyshop
        spec:
          containers:
            - name: easyshop
              image: varpriya/eshop:latest
              imagePullPolicy: Always
              ports:
                - containerPort: 3000
              envFrom:
                - configMapRef:
                    name: easyshop-config
                - secretRef:
                    name: easyshop-secret
              env:
                - name: NEXTAUTH_URL
                  valueFrom:
                    configMapKeyRef:
                      name: easyshop-config
                      key: NEXTAUTH_URL
                - name: NEXTAUTH_SECRET
                  valueFrom:
                    secretKeyRef:
                      name: easyshop-secret
                      key: NEXTAUTH_SECRET
                - name: JWT_SECRET
                  valueFrom:
                    secretKeyRef:
                      name: easyshop-secret
                      key: JWT_SECRET
              resources:
                requests:
                  memory: "256Mi"
                  cpu: "200m"
                limits:
                  memory: "512Mi"
                  cpu: "500m"
              startupProbe:
                httpGet:
                  path: /
                  port: 3000
                failureThreshold: 30
                periodSeconds: 10
              readinessProbe:
                httpGet:
                  path: /
                  port: 3000
                initialDelaySeconds: 20
                periodSeconds: 15
              livenessProbe:
                httpGet:
                  path: /
                  port: 3000
                initialDelaySeconds: 25
                periodSeconds: 20
Apply easyshop-deployment.yaml for the application:
kubectl apply -f 08-easyshop-deployment.yaml
Create easyshop-service.yaml
Create 09-easyshop-service.yaml with the following content:
vim 09-easyshop-service.yaml
    apiVersion: v1
    kind: Service
    metadata:
      name: easyshop-service
      namespace: easyshop
    spec:
      type: NodePort
      ports:
        - port: 80
          targetPort: 3000
          nodePort: 30000
      selector:
        app: easyshop
Apply easyshop-service.yaml for the application:
kubectl apply -f 09-easyshop-service.yaml
Install NGINX Ingress Controller
kubectl apply -f https://raw.githubusercontent.com/kubernetes/ingress-nginx/main/deploy/static/provider/kind/deploy.yaml
Create ingress.yaml
Create 10-ingress.yaml with the following content:
vim 10-ingress.yaml
    apiVersion: networking.k8s.io/v1
    kind: Ingress
    metadata:
      name: easyshop-ingress
      namespace: easyshop
      annotations:
        nginx.ingress.kubernetes.io/ssl-redirect: "false"
        nginx.ingress.kubernetes.io/proxy-body-size: "50m"
    spec:
      rules:
        - host: "http://54.194.233.253.nip.io/"      #Replace with your YOUR_EC2_PUBLIC_IP and add extension od .nip.io
          http:
            paths:
              - path: /
                pathType: Prefix
                backend:
                  service:
                    name: easyshop-service
                    port:
                      number: 80
Apply ingress.yaml for the application:
kubectl apply -f 10-ingress.yaml
Create hpa.yaml
Create 11-hpa.yaml with the following content:
vim 11-hpa.yaml
    apiVersion: autoscaling/v2
    kind: HorizontalPodAutoscaler
    metadata:
      name: easyshop-hpa
      namespace: easyshop
    spec:
      scaleTargetRef:
        apiVersion: apps/v1
        kind: Deployment
        name: easyshop
      minReplicas: 2
      maxReplicas: 10
      metrics:
        - type: Resource
          resource:
            name: cpu
            target:
              type: Utilization
              averageUtilization: 70
Apply easyshop-service.yaml for the application:
kubectl apply -f 11-hpa.yaml
Create migration-job.yaml
Create 12-migration-job.yaml with the following content:
vim 12-migration-job.yaml
    apiVersion: batch/v1
    kind: Job
    metadata:
      name: db-migration
      namespace: easyshop
    spec:
      template:
        spec:
          containers:
            - name: migration
              image: varpriya/eshop-migration:latest     #replace with your dockerhub image
              imagePullPolicy: Always
              env:
                - name: MONGODB_URI
                  value: "mongodb://mongodb-service:27017/easyshop"
          restartPolicy: OnFailure
Apply easyshop-service.yaml for the application:
kubectl apply -f 12-migration-job.yaml
Verify that the pods are running:
kubectl get pods -n easyshop
Expected output:

Expose Application Using Ingress
Check if the Ingress is configured properly:
kubectl get ingress -n easyshop
Expected output:
    NAME               CLASS    HOSTS                    ADDRESS   PORTS   AGE
    easyshop-ingress   <none>    54.194.233.253.nip.io            80      2m
Verify the Deployment:
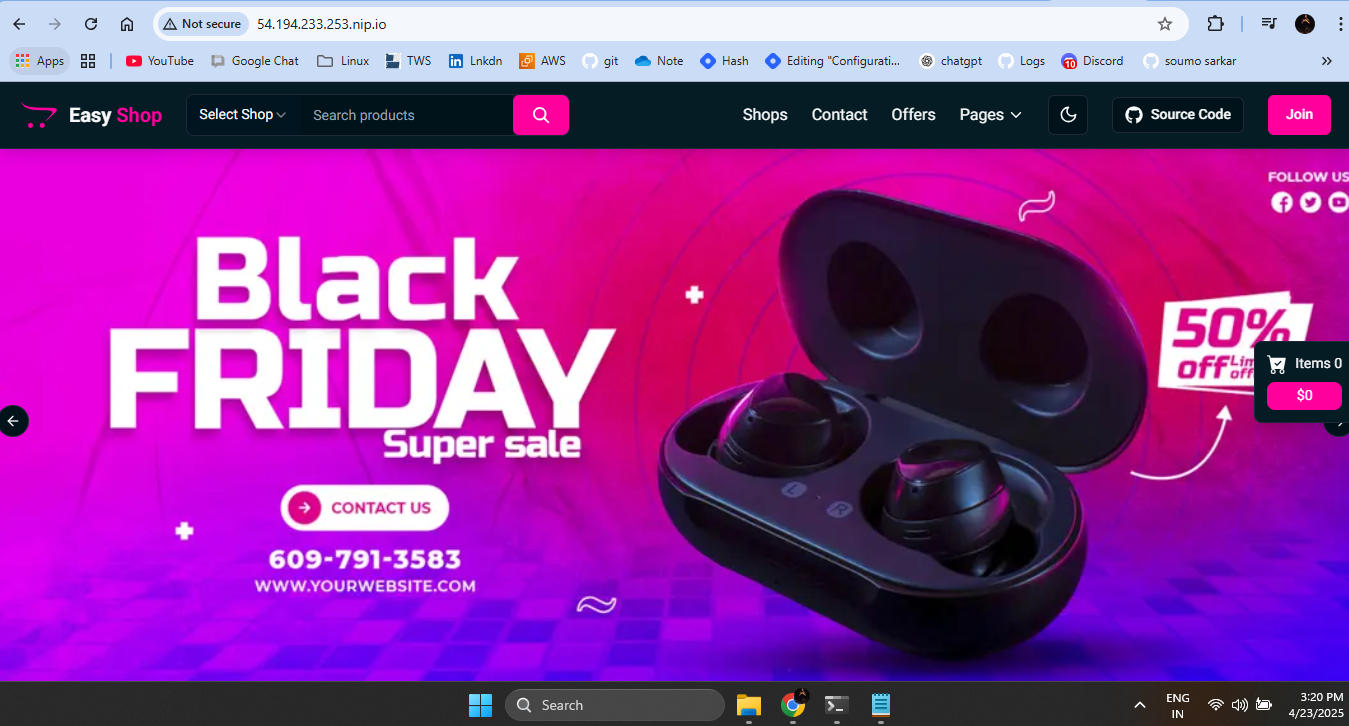
To access the application, open your browser and visit:
http:// 54.194.233.253.nip.io
If the application does not load, check:
    kubectl describe ingress easyshop-ingress -n easyshop
    kubectl get pods -n easyshop
    kubectl logs <pod-name> -n easyshop
18.Port Forwarding (Optional)
If the Ingress is not working, try port forwarding:
kubectl port-forward svc/easyshop-service 8080:80 -n easyshop
Then open:
http://localhost:8080/
Troubleshooting
If pods are not starting, check logs:
For MongoDB connection issues:
To restart deployments:
Cleanup
To delete the cluster:
kind delete cluster --name easyshop
Conclusion
Congratulations! 🎉 Your EasyShop application is now up and running on Kubernetes. If you encounter any issues along the way, be sure to check the logs or consult the troubleshooting guide.
Wishing you smooth deployments and happy coding! 🚀